Readies
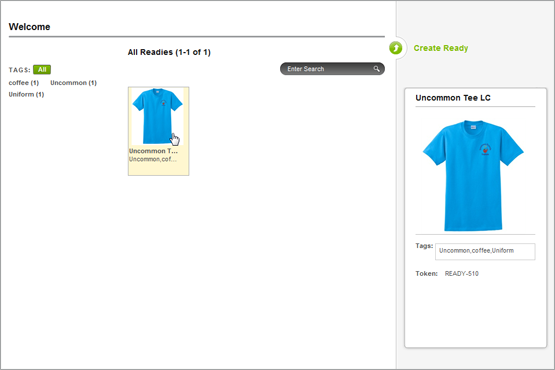
Readies are where everything comes together, and the readies page contains information about all of them. Readies are Blanks with combinations of design and text elements or compositions applied to them.
This list in the center column of the page contains the readies. When several readies have been created, more pages will be added. Hovering over a ready will bring up a preview in the right column of the page.

Editing, Duplicating, and Deleting Readies
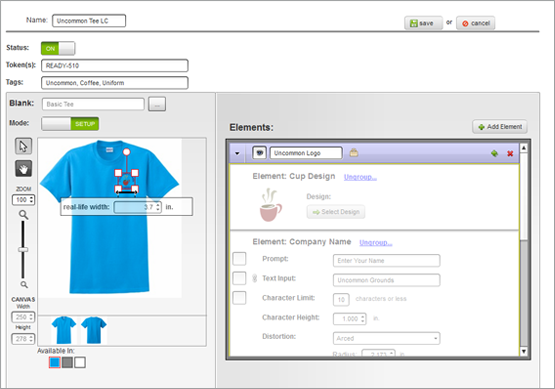
To edit an existing ready, select the ready from the center column by clicking on it. This will bring up a page with all the same tools as the ready creation page. In the top right corner, you have the option to edit the ready. Click on that, and you will have access to the editor, status, tokens/IDs, tags, and the elements list.
To duplicate an existing ready, select the ready from the center column by clicking on it. This will bring up a page with all the same tools as the ready creation page. In the top right corner, you have the option to duplicate the ready. Click on that and you will be taken back to the main readies page. This time, however, there will be two identical readies. You can now use one of them as a starting point for another ready.
To delete an existing ready, select the ready from the center column by clicking on it. This will bring up a page with all the same tools as the ready creation page. In the top right corner, you have the option to delete the ready. Click on that and you will see an alert asking if you want to delete the ready. Click OK to delete it.
Creating a Ready
Click on the Create Ready link at the top of the right column. This will bring you to the ready creation page.

Add a name for the composition and appropriate tags in the fields in the top left corner of the page. Separate multiple tags with comas.
Token/Ready ID: This field is automatically populated but can be changed to any unique value. This ID is used to communicate with your site and identify which ready to use in the personalization interface.
Selecting a Blank
Readies are created from adding compositions and/or design or text elements to a blank. The first step in creating a ready is to select a blank. Begin by clicking on the button beside the Blank field. This will bring up the window from which to select the blank. Selecting the blank and then clicking OK or double-clicking on the blank will select that blank and close the window.
Adding Elements
The process of adding elements is mostly the same as adding elements to a composition. The biggest differences are the lock and the visibility icon.
Visibility on Views
When you add an element, it is visible on every view of the product. If you add a graphic element for the front of a shirt, you will most likely want to switch to the back view of the product and turn off the visibility of the element. You can do this by clicking on the visibility icon (the eyeball) which will remove it. The icon should only be on for the elements meant to be visible on the currently selected view.
Grouping (Elements)
Elements added to a ready also have the option of being grouped. Clicking on �Group with�� will provide a dropdown menu of other elements with which it can be grouped. Grouping elements will bind them together in the visual editor. The groups can be named and save by pressing the small green diskette to the right of the name. This will save the group as a new composition.
While grouping can be used to create compositions, it is recommended that compositions be created beforehand in their own tab. The visual editor in the compositions tab has a size grid and other tools to make the creation of the compositions much more precise.
Lock (Compositions)
The lock is another difference. Unlocking a composition will allow you access to the elements that make it up. To do this, click on the padlock icon new to the composition name field. This will allow you to edit their parameters to better fit the blank. This is not necessary, but can sometimes be useful.
Keep in mind that once the composition is unlocked, each element will now be independent and will generate a separate production files.
Visual Editor
Mode: Setup / Preview
With readies, the visual editor acts a preview layout tool when in setup mode, but it will also give you an good idea of the customer experience if the mode toggle is set to preview.
Setting the Size of the Design Preview
In the visual editor, you will need to scale the graphic elements so that they appear of appropriate on the product. When a graphic element is selected, the actual size is displayed below the elements. The elements can be scaled graphically to match the proportions of the product image.
If the composition or design elements are using files that can be scaled well, the real-life width can be changed by typing or using the small arrows to the side.
Adjusting Placement on Different Color Previews
Because the product images may not all be the same for each color, you may want to adjust the placement of a graphic elements on a view of a product. For example, if the product image is a shirt that comes in red, blue, and green, and the shirt is being worn by a model, each view of the front might be slightly shifted. If the graphic element is meant for a left chest placement, you may want to preview each color and adjust the elements to fit in the appropriate place on each product image.