Blanks
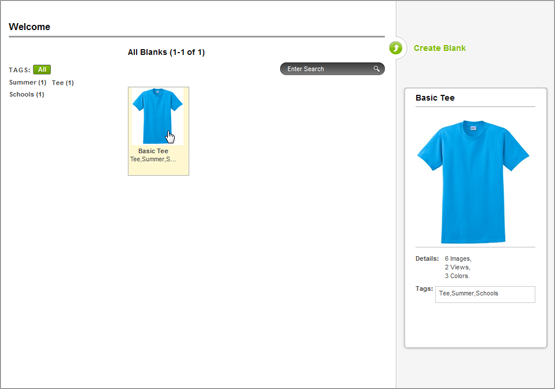
On the Blanks tab, a list of all the blanks available for Fusion can be seen.
The Blanks page contains information about all of blank products available for use with Fusion. This list in the center column of the page contains the blanks. When several blanks have been created, more pages will be added. Hovering over a blank will bring up a preview in the right column of the page along with information on the number of views, colors, and product images are used in the blank.

Editing, Duplicating, and Deleting Blanks
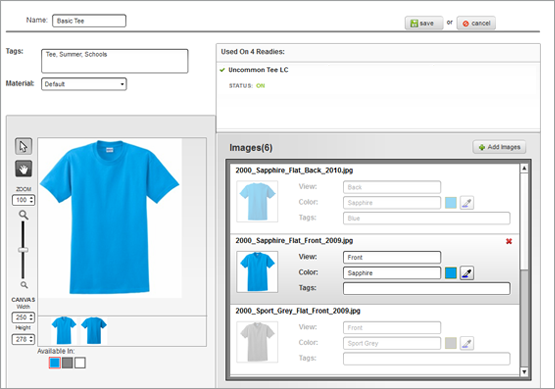
To edit an existing blank, select the blank from the center column by clicking on it. This will bring up a page with all the same tools as the page used to create blanks. In the top right corner, you have the option to edit the blank. Click on that and you will have access to the editor and the images list.
To duplicate an existing blank, select the blank from the center column by clicking on it. This will bring up a page with all the same tools as the page used to create blanks. In the top right corner, you have the option to duplicate the blank. Click on that and you will be taken back to the main blanks page. This time, however, there will be two identical blanks. You can now use one of them as a starting point for another blank.
To delete an existing blank, select the blank from the center column by clicking on it. This will bring up a page with all the same tools as the page used to create blanks. In the top right corner, you have the option to delete the blank. Click on that and you will see an alert asking if you want to delete the blank. Click OK to delete it.
To create a blank, click on the Create Blank link at the top of the right column. This will bring you to the blank creation page. After you are finished, click Save in the upper right corner.

Add a name for the blank and appropriate tags in the fields in the top left corner of the page. Separate multiple tags with comas.
Images (Product Images)
Adding Product Images
To add images to a blank, click the Add Images button on the right side of the Images window. From the Add Image(s) window popup, images can either be obtained from a URL or by uploading and image from your computer.
From the web: type or past the URL for the image in the field provided and click the �Get� button. The image will display in the box below.
From a file: Click Upload to browse for a .JPG or .PNG from your computer. Multiple files can be uploaded at a time. The uploaded images will be displayed in the box below.
Click �Import selected Images� to import all of the images with a check mark in the lower left corner. If an image should not be imported, simply uncheck it before clicking the Import button.
Imported images will display in the images list.
Deleting Product Images
To delete images from a blank, select the image in the image list. Then, click on the small red �X� in the upper right corner. An alert will come up asking if you are sure that you want to delete the selected image. Click OK, and the image will be deleted.
Setting Image Parameters
With each image, the view, color, and tags can be set.
View: The view for each image needs to be set. Common view names would be labels like �Front� or �Back�.
Color: Enter the name of the color in the color field. Then the color preview swatch to the right of the name will need to be set. There are two methods for doing this.
The eye dropper tool is the fastest and probably the easiest. Click on the eye dropper tool to select it. Then, click in the product image on the most representative color area. That color will now appear in the preview swatch.
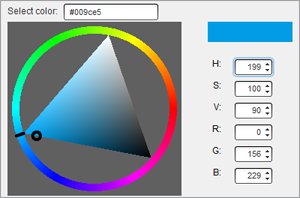
The color swatch to the right of the name acts as a preview, but clicking on it will bring up a color selection tool. From here, a color can be chosen by entering RGB, HSV, or hexadecimal values or by dragging the two markers in the color picker. To finish, just click outside of the color picker box or press Enter on your keyboard.

Once a color preview has been set, any other views with the same color name will automatically have the same preview color. When one swatch is changed, all others with the same name will also be updated.
Consistency Counts!
Both the color name and view name are case sensitive. �Back� is not the same view as �back�, and using both �Red� and �red� will create two colors.
Visual Editor
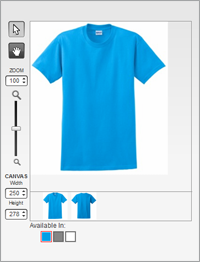
The visual editor on the blanks page starts to give a preview of the customer experience.

When the images are first added to the blank, they will all appear as one color option. The colors are shown at the bottom of the editor.
As colors are added to the images, more swatches will appear, and only images associated with the selected color swatch will display.
The view names also become more important at this stage. If the �Front� is the selected view and another color is selected, the �Front� will be the view that is displayed.
Changing the Order of Views
To change the order of the views for your customers, click and drag the views in the view area of the editor.
Finding Blanks
Blanks can be found on the main blanks page by typing the name or part of the name or tags in the search field and clicking the magnifying glass. Only blanks that contain that information will be displayed in the list.
The Blank list can also be narrowed by clicking on any of the tags listed in the left column. If multiple tags are selected, only blanks tagged with all of the selected tags will be displayed. Selected tags will be displayed with a green box behind them. Clicking on a selected tag will deselect it.
Tags will also display the number of blanks with that tag.